The article tells about how to deal with the status bar in Android. This article is intended for beginners only studying for the Android platform under development. Also worth noting that the status bar is more used to notify the user of any events occurring in a system that unites its target with pop-up notifications Toast. On Habrahabr already has a fairly complete article on using Toast, and this post only develops the theme of the notifications.
The text itself was written articles for the sandbox, and in fact Hello world as it is. Now I'm interested in wondering whether anyone at all, or a direction, or it's not worth it.
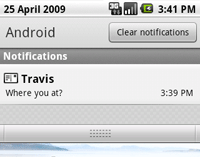
In the first screenshot shows the status bar is disclosed in a standard envelope Android (some manufacturers of mobile devices in their shells can change its appearance, though the essence remains the same). The status bar in the Android is mostly used to notify the user of any events occurring in the system, as well as on the outcome of any applications. The essential difference from the pop-up notifications Toast is that the notification in the status bar does not disappear after a while, and "hang" there until the user somehow they react. Status bar is useful to receive notifications from applications running in the background, as well as with the emergence of a notification, you can play any sound, vibration, or use the flashing LED on the device (if any). The notification submitted by the screenshot - is exactly what we are today and will work.
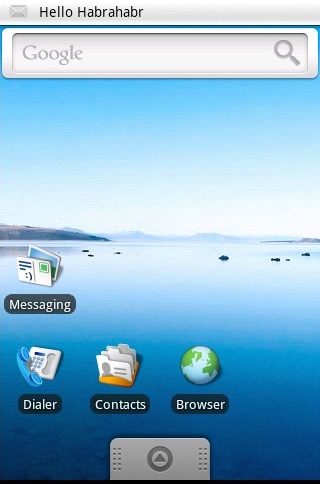
For a start try to create a standard disclaimer to the command line as it is recommended by Google. The layout of the application interface remain unchanged (notice to appear immediately after you start it). And so, the sample code (with commentary of what is possible may not be clear):
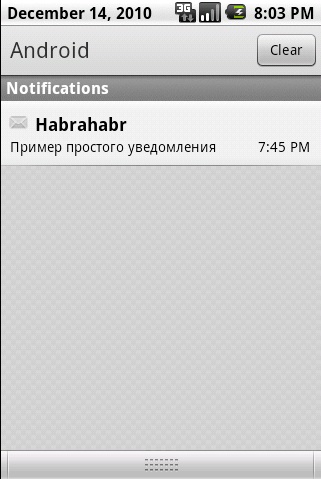
CharSequence tickerText = «Hello Habrahabr»; - in this line, we specify the text to be displayed in the minimized status bar for a few seconds with the appearance notice. After a few seconds it will disappear, and the line will only icon.
That's probably it. You can open the champagne, and watch what we have.
Now a few complicate the task - we will create a notification is not a pattern that suggests Google, but on its own markup (since there is such a possibility). And so we create a new markup file in the folder layout, you should get it like this:
Also add any folder or image in drawable so then set it to ImageView.
Now the code. The code is not very different from the code, a simple notice, but nevertheless requires comment
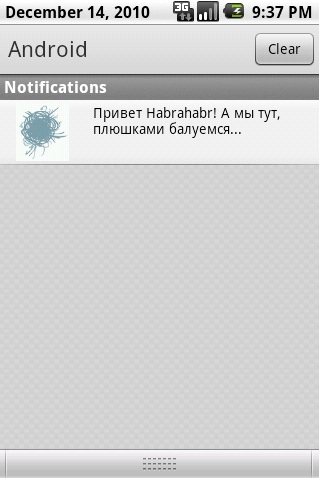
As a result, we can open a second bottle, and observe about this picture:
For good measure, add the importance of sound in the derivation of the notification and vibration. Make it's not hard.
notification.defaults | = Notification.DEFAULT_SOUND; - this line sets the notification sound that is used by default.
notification.sound = Uri.parse («file: / / / sdcard/notification/ringer.mp3»); - this way you can install the sound from a file on your SD card.
notification.defaults | = Notification.DEFAULT_VIBRATE; - this adds a vibration in the Number of time by default.
In addition it is possible to set the time of vibration of their own. This is done in two lines
long [] vibrate = {0,100,200,300}; - create a file in which the first number - the time that you should wait before you start the vibration. The second meaning - the first vibration in milliseconds (the same, and 3, and 4 value). Amount of vibration may be infinitely large at the discretion of the programmer.
notification.vibrate = vibrate; - assign the array to our notice.
notification.defaults | = Notification.DEFAULT_LIGHTS; - this string we can blink with the default settings.
Of course, you can configure and ruchnuyu.Dlya this, we need four lines:
notification.ledARGB = 0xff00ff00; - sets the color for the RGB LED.
notification.ledOnMS = 300 - sets the time between blinks
notification.ledOffMS = 1000 - sets the time after which the indicator will extinguish burning
notification.flags | = Notification.FLAG_SHOW_LIGHTS; - allow flash
Here it should be noted that not all devices in general, there are any indicators.
Naturally, all these settings must be done before a line call notice.
That's probably it. Fasting does not purport to, and yet this information should be enough for beginners. As a source, as well as a more complete description of the work with NotificationBar can bring the original article ondeveloper.android.com . I hope someone can help, or article in the study of the platform. Thank you for your attention.
UPD: on closer examination it turned out that the comment to one of the missing lines of code (a code promises to explain, but most explanations there). Annoying bug fixes, as well as a number of faculty and a status bar that I forgot to inform the user fills DjVu , you can look in the comments: 1 , 2 . On the existence of serious pitfalls reports sdmitry 's here .
The text itself was written articles for the sandbox, and in fact Hello world as it is. Now I'm interested in wondering whether anyone at all, or a direction, or it's not worth it.
A brief notice about the line
In the first screenshot shows the status bar is disclosed in a standard envelope Android (some manufacturers of mobile devices in their shells can change its appearance, though the essence remains the same). The status bar in the Android is mostly used to notify the user of any events occurring in the system, as well as on the outcome of any applications. The essential difference from the pop-up notifications Toast is that the notification in the status bar does not disappear after a while, and "hang" there until the user somehow they react. Status bar is useful to receive notifications from applications running in the background, as well as with the emergence of a notification, you can play any sound, vibration, or use the flashing LED on the device (if any). The notification submitted by the screenshot - is exactly what we are today and will work.
Create a simple notification on the status bar
For a start try to create a standard disclaimer to the command line as it is recommended by Google. The layout of the application interface remain unchanged (notice to appear immediately after you start it). And so, the sample code (with commentary of what is possible may not be clear):
public class NotificationBar extends Activity {

/** Called when the activity is first created. */


private static final int NOTIFY_ID = 1; // Уникальный индификатор вашего уведомления в пределах класса

@Override


public void onCreate(Bundle savedInstanceState) {

super.onCreate(savedInstanceState);

setContentView(R.layout.main);

NotificationManager mNotificationManager = (NotificationManager) getSystemService(Context.NOTIFICATION_SERVICE); // Создаем экземпляр менеджера уведомлений

int icon = android.R.drawable.sym_action_email; // Иконка для уведомления, я решил воспользоваться стандартной иконкой для Email

CharSequence tickerText = "Hello Habrahabr" ; // Подробнее под кодом

long when = System.currentTimeMillis(); // Выясним системное время

Notification notification = new Notification(icon, tickerText, when); // Создаем экземпляр уведомления, и передаем ему наши параметры

Context context = getApplicationContext();

CharSequence contentTitle = "Habrahabr" ; // Текст заголовка уведомления при развернутой строке статуса

CharSequence contentText = "Пример простого уведомления" ; //Текст под заголовком уведомления при развернутой строке статуса

Intent notificationIntent = new Intent( this , NotificationBar. class ); // Создаем экземпляр Intent

PendingIntent contentIntent = PendingIntent.getActivity( this , 0, notificationIntent, 0); class ); // Подробное описание в UPD к статье

notification.setLatestEventInfo(context, contentTitle, contentText, contentIntent); // Передаем в наше уведомление параметры вида при развернутой строке состояния

mNotificationManager.notify(NOTIFY_ID, notification); // И наконец показываем наше уведомление через менеджер передав его ID

}

}
* This source code with WAS Highlighted Source Code Highlighter .
CharSequence tickerText = «Hello Habrahabr»; - in this line, we specify the text to be displayed in the minimized status bar for a few seconds with the appearance notice. After a few seconds it will disappear, and the line will only icon.
That's probably it. You can open the champagne, and watch what we have.
Create an advanced notification in the status bar
Now a few complicate the task - we will create a notification is not a pattern that suggests Google, but on its own markup (since there is such a possibility). And so we create a new markup file in the folder layout, you should get it like this:
< LinearLayout xmlns:android ="http://schemas.android.com/apk/res/android"

android:orientation ="horizontal"

android:layout_width ="fill_parent"

android:layout_height ="fill_parent"

android:padding ="3dp"

>

< ImageView android:id ="@+id/image"

android:layout_width ="wrap_content"

android:layout_height ="fill_parent"

android:layout_marginRight ="10dp"

/>

< TextView android:id ="@+id/text"

android:layout_width ="wrap_content"

android:layout_height ="fill_parent"

android:textColor ="#000"

/>

</ LinearLayout >


* This source code was highlighted with Source Code Highlighter .
Also add any folder or image in drawable so then set it to ImageView.
Now the code. The code is not very different from the code, a simple notice, but nevertheless requires comment
public class NotificationBar extends Activity {

/** Called when the activity is first created. */


private static final int NOTIFY_ID = 1; // Уникальный индификатор вашего уведомления в пределах класса

@Override


public void onCreate(Bundle savedInstanceState) {

super.onCreate(savedInstanceState);

NotificationManager mNotificationManager = (NotificationManager) getSystemService(Context.NOTIFICATION_SERVICE); // Создаем экземпляр менеджера уведомлений

int icon = android.R.drawable.sym_action_email; // Иконка для уведомления, я решил воспользоваться стандартной иконкой для Email

CharSequence tickerText = "Hello Habrahabr" ; // Подробнее под кодом

long when = System.currentTimeMillis(); // Выясним системное время

Intent notificationIntent = new Intent( this , NotificationBar. class ); // Создаем экземпляр Intent

Notification notification = new Notification(icon, tickerText, when); // Создаем экземпляр уведомления, и передаем ему наши параметры

PendingIntent contentIntent = PendingIntent.getActivity( this , 0, notificationIntent, 0); // Подробное описание смотреть в UPD к статье

RemoteViews contentView = new RemoteViews(getPackageName(), R.layout.notlayout); // Создаем экземпляр RemoteViews указывая использовать разметку нашего уведомления

contentView.setImageViewResource(R.id.image, R.drawable.habr); // Привязываем нашу картинку к ImageView в разметке уведомления

contentView.setTextViewText(R.id.text, "Привет Habrahabr! А мы тут, плюшками балуемся..." ); // Привязываем текст к TextView в нашей разметке

notification.contentIntent = contentIntent; // Присваиваем contentIntent нашему уведомлению

notification.contentView = contentView; // Присваиваем contentView нашему уведомлению

mNotificationManager.notify(NOTIFY_ID, notification); // Выводим уведомление в строку

}

}


* This source code was highlighted with Source Code Highlighter .
As a result, we can open a second bottle, and observe about this picture:
Adding sound and vibration, blinking.
For good measure, add the importance of sound in the derivation of the notification and vibration. Make it's not hard.
notification.defaults | = Notification.DEFAULT_SOUND; - this line sets the notification sound that is used by default.
notification.sound = Uri.parse («file: / / / sdcard/notification/ringer.mp3»); - this way you can install the sound from a file on your SD card.
notification.defaults | = Notification.DEFAULT_VIBRATE; - this adds a vibration in the Number of time by default.
In addition it is possible to set the time of vibration of their own. This is done in two lines
long [] vibrate = {0,100,200,300}; - create a file in which the first number - the time that you should wait before you start the vibration. The second meaning - the first vibration in milliseconds (the same, and 3, and 4 value). Amount of vibration may be infinitely large at the discretion of the programmer.
notification.vibrate = vibrate; - assign the array to our notice.
notification.defaults | = Notification.DEFAULT_LIGHTS; - this string we can blink with the default settings.
Of course, you can configure and ruchnuyu.Dlya this, we need four lines:
notification.ledARGB = 0xff00ff00; - sets the color for the RGB LED.
notification.ledOnMS = 300 - sets the time between blinks
notification.ledOffMS = 1000 - sets the time after which the indicator will extinguish burning
notification.flags | = Notification.FLAG_SHOW_LIGHTS; - allow flash
Here it should be noted that not all devices in general, there are any indicators.
Naturally, all these settings must be done before a line call notice.
Conclusion
That's probably it. Fasting does not purport to, and yet this information should be enough for beginners. As a source, as well as a more complete description of the work with NotificationBar can bring the original article ondeveloper.android.com . I hope someone can help, or article in the study of the platform. Thank you for your attention.
UPD: on closer examination it turned out that the comment to one of the missing lines of code (a code promises to explain, but most explanations there). Annoying bug fixes, as well as a number of faculty and a status bar that I forgot to inform the user fills DjVu , you can look in the comments: 1 , 2 . On the existence of serious pitfalls reports sdmitry 's here .