
This article is for those who have already written the HelloWorld for Android, and know what the Activity and Intent, as well as where there is manifest, and why you need layout'y. Otherwise, you acquainted with this material, for example, developer.android.com .
The article describes how to create a simple application that uses a mechanism to implement the search capabilities built based on the framework. After reading, you can also configure your application so that it searches through the data using a standard Android Search Dialog.
A bit of theory
Android Search Dialog (hereinafter - the "search dialog") is controlled using a search framework. This means that the developer does not need to worry over how to paint or how to catch the search query. For this job you willSearchManager .
So, when a user starts searching, SearchManager creates Intent, and sends it to the Activity, which is responsible for searching for data (in this case the query is placed in the extras). That is, in fact in the application must have at least one Activity, which receives Intent'y search, searches, and provides the user with the results. To realize you need:
- Xml configuration file (it contains information about the dialogue)
- Activity, which will receive queries, perform searches and display the results on screen
- The mechanism of calling the search dialog (since not all devices with Android on board are on the case of the search button)
The configuration file
Start by creating a configuration file, because it's the easy part. Of course, you need to prepare in advance, to create a new project, Activity (I used Activity «Main» and the name of the project «SearchExample»). All that is needed for the configuration - is to create a file in a subdirectory searchable.xml res / xml / your project, with the following content.
<? xml version ="1.0" encoding ="utf-8" ? >

< searchable xmlns:android ="http://schemas.android.com/apk/res/android"

android:label ="@string/app_name"

android:hint ="@string/search_hint"

>

</ searchable >


* This source code was highlighted with Source Code Highlighter .
Required attribute is only android: label, and it must refer to a string that is the same as the name of the application. The second attribute, android: hint is used to display an empty row in the dialog. For example, it might be "Search Videos" or "search contacts", etc. This attribute specifies which data to be searched. It is also important to know that the element searchable supports many other attributes, you can read more here .
Create an Activity
Minimally, all we need from the UI Activity - a list to display the search results and the mechanism of calling the search dialog. Let's do that by adding just the text field and button, so that we ourselves can fill the base.Looking ahead, I will say that the data will be stored in a database SQLite.
We describe the interface of Activity as follows (the file is in res / layout / main.xml).
<? xml version ="1.0" encoding ="utf-8" ? >

< LinearLayout xmlns:android ="http://schemas.android.com/apk/res/android"

android:orientation ="vertical"

android:layout_width ="fill_parent"

android:layout_height ="fill_parent" >

< LinearLayout

android:orientation ="horizontal"

android:layout_width ="fill_parent"

android:layout_height ="wrap_content"

android:gravity ="top" >

< EditText

android:id ="@+id/text"

android:layout_width ="wrap_content"

android:layout_height ="wrap_content"

android:hint ="@string/text"

android:layout_weight ="100.0" />

< Button

android:id ="@+id/add"

android:layout_width ="wrap_content"

android:layout_height ="wrap_content"

android:text ="@string/add" />

</ LinearLayout >

< ListView

android:id ="@android:id/list"

android:layout_width ="fill_parent"

android:layout_height ="wrap_content" />

< TextView

android:layout_gravity ="left"

android:id ="@android:id/empty"

android:layout_width ="fill_parent"

android:layout_height ="fill_parent"

android:text ="@string/no_records" />

</ LinearLayout >


* This source code was highlighted with Source Code Highlighter .
As follows:
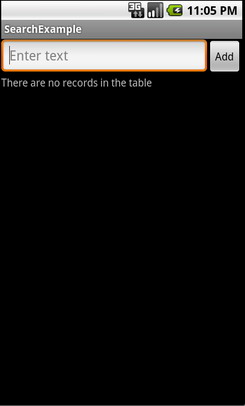
We also need to layout the form of a list item, describe it in the simplest way (the file is in res / layout / record.xml)
<? xml version ="1.0" encoding ="utf-8" ? >

< TextView

android:id ="@+id/text1"

xmlns:android ="http://schemas.android.com/apk/res/android"

android:layout_width ="wrap_content"

android:layout_height ="wrap_content"

/>


* This source code was highlighted with Source Code Highlighter .
Also, do not forget about the resource file that stores our string (a file in res / values / strings.xml)
<? xml version ="1.0" encoding ="utf-8" ? >

< resources >

< string name ="app_name" > SearchExample </ string >

< string name ="add" > Add </ string >

< string name ="text" > Enter text </ string >

< string name ="no_records" > There are no records in the table </ string >

< string name ="search_hint" > Search the records </ string >

< string name ="search" > Search </ string >

</ resources >


* This source code was highlighted with Source Code Highlighter .
I recall that when the user performs a search, you need to send SearchManager Intent with the search query to our Activity. To SearchManager knew exactly where to send the Intent, must declare it in the manifest. So, go to AndroidManifest.xml, and change it so that it could take Activity type Intent'y Search. In addition, we apply our configuration file searchable.xml. Thus, the manifest will look something like this:
<? xml version ="1.0" encoding ="utf-8" ? >

< manifest xmlns:android ="http://schemas.android.com/apk/res/android"

package ="com.example.search"

android:versionCode ="1"

android:versionName ="1.0" >

< application android:icon ="@drawable/icon" android:label ="@string/app_name" >

< activity android:name =".Main"

android:label ="@string/app_name" >

< intent-filter >

< action android:name ="android.intent.action.MAIN" />

< category android:name ="android.intent.category.LAUNCHER" />

</ intent-filter >

< intent-filter >

< action android:name ="android.intent.action.SEARCH" />

</ intent-filter >

< meta-data

android:name ="android.app.searchable"

android:resource ="@xml/searchable"

/>

</ activity >


</ application >

< uses-sdk android:minSdkVersion ="5" />


</ manifest >


* This source code was highlighted with Source Code Highlighter .
Now, you can now check that all you have done correctly. Call the dialogue on the emulator you can, for example, by pressing the search button. Well, or if you check on devayse, then holding down the "Menu". Should look like this:
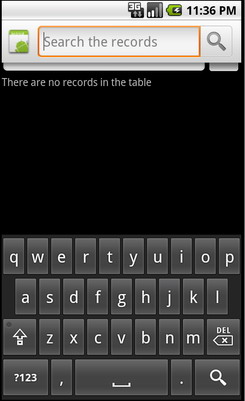
Perform a search
After we announced our Activity and make the necessary changes in AndroidManifest.xml, we can consider itself doing a search. It includes three stages:
- Receipt of an inquiry
- Data Search
- output results
Receipt of an inquiry
Since SearchManager sends Intent type Search our Activity, then all you need to do is check on the Intent of this type at the start of Activity. Then, if we get the desired Intent, then you can retrieve it from the extrusion, and search.
Data Search
Since the type of data storage structures for different applications can vary, the methods for them and theirs. In our case, the easiest way to query the database table query SQLite LIKE. Of course, it is better to use FTS3, it is much faster, more about FTS3 can be read on the site SQLite.org . Ideally, as one should always expect that the search may take a long time, so you can create some ProgressDialog, so we have not hung interface, and that the user knows that the application works.
Output results
In general, the output of the results - it is a problem UI, but since we use the ListView, then for us the problem is solved by simply updating the adapter.
Source
Finally, I cite the full source code of two classes with commentary. First - Main, heir ListActivity, it is used to populate the database and display the results. The second class - RecordsDbHelper, it implements an interface to interact with the database. The most important methods - add entries and search for matches, with a query LIKE.
File Main.java
package com.example.search;


import android.app.ListActivity;

import android.app.SearchManager;

import android.content.Intent;

import android.database.Cursor;

import android.os.Bundle;

import android.view.Menu;

import android.view.MenuInflater;

import android.view.MenuItem;

import android.view.View;

import android.widget.Button;

import android.widget.EditText;

import android.widget.SimpleCursorAdapter;


public class Main extends ListActivity {

private EditText text;

private Button add;

private RecordsDbHelper mDbHelper;


@Override

public void onCreate(Bundle savedInstanceState) {

super.onCreate(savedInstanceState);

setContentView(R.layout.main);

//Создаем экземпляр БД

mDbHelper = new RecordsDbHelper( this );

//Открываем БД для записи

mDbHelper.open();

//Получаем Intent

Intent intent = getIntent();

//Проверяем тип Intent

if (Intent.ACTION_SEARCH.equals(intent.getAction())) {

//Берем строку запроса из экстры

String query = intent.getStringExtra(SearchManager.QUERY);

//Выполняем поиск

showResults(query);

}


add = (Button) findViewById(R.id.add);

text = (EditText) findViewById(R.id.text);

add.setOnClickListener( new View.OnClickListener() {

public void onClick(View view) {

String data = text.getText().toString();

if (!data.equals( "" )) {

saveTask(data);

text.setText( "" );

}

}

});

}


private void saveTask( String data) {

mDbHelper.createRecord(data);

}


private void showResults( String query) {

//Ищем совпадения

Cursor cursor = mDbHelper.fetchRecordsByQuery(query);

startManagingCursor(cursor);

String [] from = new String [] { RecordsDbHelper.KEY_DATA };

int [] to = new int [] { R.id.text1 };


SimpleCursorAdapter records = new SimpleCursorAdapter( this ,

R.layout.record, cursor, from , to);

//Обновляем адаптер

setListAdapter(records);

}

//Создаем меню для вызова поиска (интерфейс в res/menu/main_menu.xml)

public boolean onCreateOptionsMenu(Menu menu) {

MenuInflater inflater = getMenuInflater();

inflater.inflate(R.menu.main_menu, menu);

return true ;

}


public boolean onOptionsItemSelected(MenuItem item) {

switch (item.getItemId()) {

case R.id.search_record:

onSearchRequested();

return true ;

default :

return super.onOptionsItemSelected(item);

}

}

}


* This source code was highlighted with Source Code Highlighter .
File RecordsDbHelper.java
package com.example.search;


import android.content.ContentValues;

import android.content.Context;

import android.database.Cursor;

import android.database.SQLException;

import android.database.sqlite.SQLiteDatabase;

import android.database.sqlite.SQLiteOpenHelper;

import android.util.Log;


public class RecordsDbHelper {


public static final String KEY_DATA = "data" ;

public static final String KEY_ROWID = "_id" ;


private static final String TAG = "RecordsDbHelper" ;

private DatabaseHelper mDbHelper;

private SQLiteDatabase mDb;


private static final String DATABASE_CREATE = "CREATE TABLE records(_id INTEGER PRIMARY KEY AUTOINCREMENT, "

+ "data TEXT NOT NULL);" ;


private static final String DATABASE_NAME = "data" ;

private static final String DATABASE_TABLE = "records" ;

private static final int DATABASE_VERSION = 1;


private final Context mCtx;


private static class DatabaseHelper extends SQLiteOpenHelper {


DatabaseHelper(Context context) {

super(context, DATABASE_NAME, null , DATABASE_VERSION);

}


@Override

public void onCreate(SQLiteDatabase db) {


db.execSQL(DATABASE_CREATE);

}


@Override

public void onUpgrade(SQLiteDatabase db, int oldVersion, int newVersion) {

Log.w(TAG, "Upgrading database from version " + oldVersion + " to "

+ newVersion + ", which will destroy all old data" );

db.execSQL( "DROP TABLE IF EXISTS tasks" );

onCreate(db);

}

}


public RecordsDbHelper(Context ctx) {

this .mCtx = ctx;

}


public RecordsDbHelper open() throws SQLException {

mDbHelper = new DatabaseHelper(mCtx);

mDb = mDbHelper.getWritableDatabase();

return this ;

}


public void close() {

mDbHelper.close();

}


//Добавляем запись в таблицу

public long createRecord( String data) {

ContentValues initialValues = new ContentValues();

initialValues.put(KEY_DATA, data);

return mDb.insert(DATABASE_TABLE, null , initialValues);

}


//Поиск запросом LIKE

public Cursor fetchRecordsByQuery( String query) {

return mDb.query( true , DATABASE_TABLE, new String [] { KEY_ROWID,

KEY_DATA }, KEY_DATA + " LIKE" + "'%" + query + "%'" , null ,

null , null , null , null );

}

}


* This source code was highlighted with Source Code Highlighter .
Conclusion
Used for this article documents with developer.android.com
The whole project can take on code.google.com .