While I think the Android development examples are not really good and straight forward perhaps some of you come along with them. However, I would like to provide you a very very simple example here on how to write your own first Android program.
This is technically very easy.
Once you got Eclipse and Android installed and running on your computer (I use a Mac OS Leopard powered MacBook but you can use a Microsoft Windows XP/Vista/etc. PC as well) you just start Eclipse. Now you just go to “
New » Project... » Android » Android Project...” and enter the required data. Once you are done the result might look like this: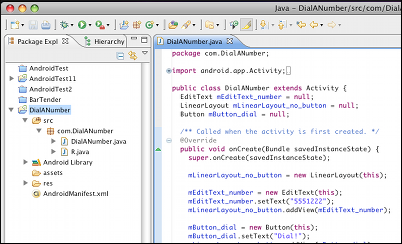
Now you can start writing and customize the default “Hello World” a.k.a. “Hello Android” app which just shows a text field. If you are really really lazy you could also copy/paste the following code:
package com.DialANumber;import android.app.Activity;
import android.content.Intent;
import android.net.Uri;
import android.os.Bundle;
import android.view.KeyEvent;
import android.view.View;
import android.widget.Button;
import android.widget.EditText;
import android.widget.LinearLayout;
public class DialANumber extends Activity {
EditText mEditText_number = null;
LinearLayout mLinearLayout_no_button = null;
Button mButton_dial = null;
/** Called when the activity is first created. */
@Override
public void onCreate(Bundle savedInstanceState) {
super.onCreate(savedInstanceState);
mLinearLayout_no_button = new LinearLayout(this);
mEditText_number = new EditText(this);
mEditText_number.setText("5551222");
mLinearLayout_no_button.addView(mEditText_number);
mButton_dial = new Button(this);
mButton_dial.setText("Dial!");
mLinearLayout_no_button.addView(mButton_dial);
mButton_dial.setOnClickListener(new View.OnClickListener() {
public void onClick(View v) {
performDial();
}
});
setContentView(mLinearLayout_no_button);
}
public boolean onKeyDown(int keyCode, KeyEvent event) {
if (keyCode == KeyEvent.KEYCODE_CALL) {
performDial();
return true;
}
return false;
} public void performDial(){
if(mEditText_number!=null){
try {
startActivity(new Intent(Intent.ACTION_CALL, Uri.parse("tel:" + mEditText_number.getText())));
} catch (Exception e) {
e.printStackTrace();
}
}//if
}
}That was quick!
Now you should create a debug runtime configuration which can be done at “Run » Debug Configurations…“. Here you select “AndroidApplication” and press “New“. Enter a name and select the “DialANumber” project. Launching the default Activity might be a good idea as we not know what the f*** it means right now.

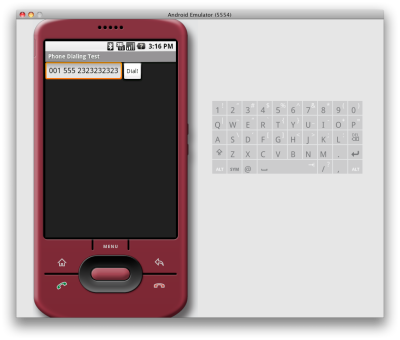
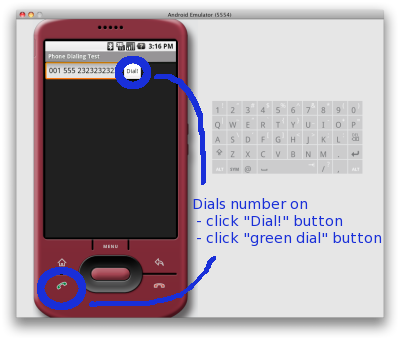
As there is an EditField for the phone number which can be modified you can also enter a new phone number in there. An example of this comes here:
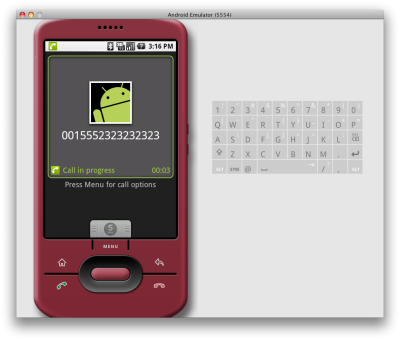
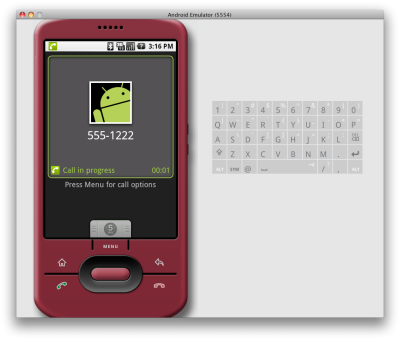
As everyone can see we are able to dial the number in two different ways:
- Hit the “Dial!” button next to the input field.
- Hit the “green dial” button on the bottom of the device.
That’s it. Pretty easy, huh?
I am looking forward to find some time in the near future to pimp this example a bit. I am thinking of a number field filter adding (which looks a bit confusing in the API documentation) or something else. Suggestions are welcome!
In case someone is
really lazy
interested you can download the whole example project here: dialanumber.zip.