Preface
The purpose of this post - on the one hand to share their successful experience in start developing applications for the Android platform and on the other hand contribute to the development of the market of software for this remarkable and rapidly growing platform for the account (without false modesty, I say) you may have read this post. The network, of course, you can find information on application development, "a little more complicated than helloworld», but as a rule they scattered and they do not describe the various small underwater stones. In this post we look at the full cycle of application development, starting with a clean computer to finished apk-file.Under the cut screens.
Preparing for development
In order to prepare for the development does not require any special actions and manipulations. Will describe the steps you need to do. I is Windows XP, so all should be classified nizheskazannoe it to the OS, although the action without some major changes can be applied to other Windows OS, even Linux.
- Installing the Eclipse development environment
- Install the ADT Plugin for Eclipse
- Installing JDK and JRE
- Install Android SDK
Installing the Eclipse development environment
It's simple. Go to the Downloads section on the official site and download version of the Classic. Then simply unzip the file wherever you want, but I decided to do it in an honorable directory C: \ Eclipse
Install the ADT Plugin for Eclipse
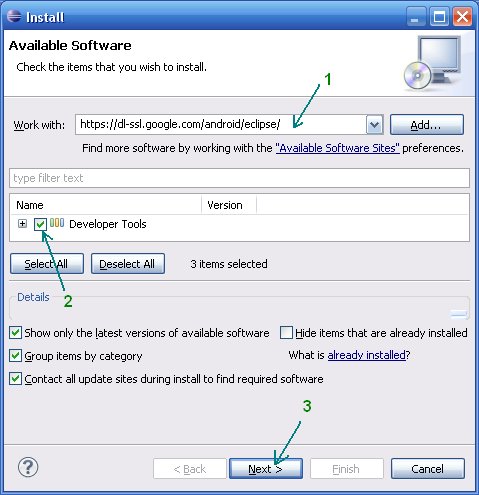
Start Eclipse, and open dialogue install the plugin via the menu Help → Install new software. In the Work with the load address is entered plug dl-ssl.google.com/android/eclipse / (if not obtained, the plugin can be downloaded and installed manually on the link http://developer.android.com/sdk/eclipse-adt. HTML ), then in the table below appear Developer Tools, mark it and go on.

After successful installation, you can restart the environment Eclipse.
Setting the Environment for Java: JDK and JRE
If you have not already installed Java Development Kit (JDK) and Java Runtime Environment (JRE), then they must be installed. This can be done on site Oracle . Download and install JDK and JRE.

Install Android SDK
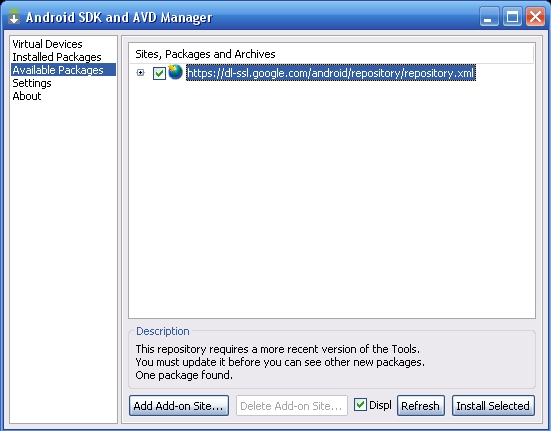
The point now we need to - this is to download and install a fresh Android SDK. This is done on site for Android developers . I personally install the SDK again in the director emeritus of C: \ Android. After that, you need to add a platform and other additional elements SDK. I added all the available versions, since the application and plan to do to early platforms, as well as USB-driver and application examples.

Preparation for the development is completed. Now the next step - the creation of an application.
Create Android-application
Before creating your first application, you can create a virtual Android-device, to quickly test it svezhenapisanny your software. First, I want to say a few words about the Android Virtual Device (AVD). This is a virtual smart phone running Android, which you can easily run you have created the program. As you can see the advantage of Android Virtual Device is that you can see clearly how your program will run on different smart phones with Android, rather than buying the entire range and test the application on each of them.
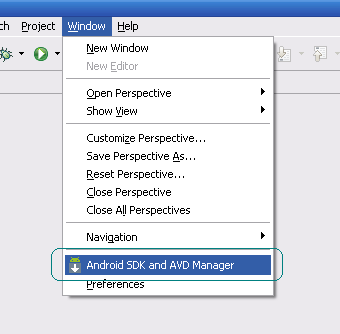
Let's create a virtual device Android. Follow the menu on the path Window → Android SDK and AVD Manager.

Choose New from the right side of the window in the window we enter the name of the virtual appliance platform (say Android 2.1), the size of the memory card (say 512 Mb), display type (for example HVGA). Then press down the button Create AVD.
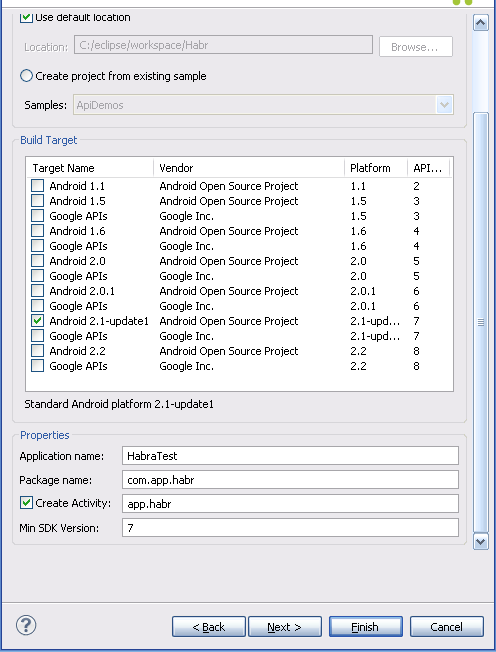
Now create a project. To do this, follow the path to the menu File → New → Other, from the list of Android → Android Project.

As an example, talk about the development of one of my simple program UfaTermometr, showing the current temperature with sensors located on one of the objects of the local energy company.
After creating the project, to the left you will see a directory tree. First and foremost, upload your application icon, or rather three icons for different options. In the folder drawable-hdpi ship png-image with a transparent background, size 72x72, in drawable-mdpi respectively 48x48 and drawable-ldpi the smallest size of 36x36. You can do this by dragging and dropping files directly on the tree. The next step will be the controls. In my program had to be all three elements of the interface: ImageView (just a picture logo of the application), Button (update the value of temperature), and TextView (output temperature). All of these controls must be described in a special xml-file. The tree is located at res → layout → main.xml. In many respects layout of controls is similar to the layout of Web pages, and there is padding, and margin, and the analog align. Main.xml my application code:
<? xml version ="1.0" encoding ="utf-8" ? >

< LinearLayout xmlns:android ="http://schemas.android.com/apk/res/android"

android:orientation ="vertical"

android:layout_width ="fill_parent"

android:layout_height ="fill_parent"

>

< ImageView android:layout_width ="fill_parent"

android:layout_height ="wrap_content"

android:src ="@drawable/droid"

android:layout_gravity ="center_horizontal|center"

android:layout_margin ="0px"

/>

< Button

android:id ="@+id/refrbutton"

android:layout_width ="wrap_content"

android:layout_height ="wrap_content"

android:gravity ="center_horizontal"

android:layout_gravity ="center_horizontal|center"

android:textSize ="30px"

android:padding ="20px"

android:layout_marginTop ="10dip"

android:text ="Обновить"

/>

< TextView

android:layout_width ="fill_parent"

android:layout_height ="wrap_content"

android:text ="..."

android:textSize ="100dip"

android:gravity ="center_horizontal"

android:id ="@+id/temper"

android:textColor ="#EEE3C4"

/>

</ LinearLayout >Application code is located directly on the path src → «name your package» → «name of the application». Java.
By default, a "Plural" main class and she is more you can dance. I will not dwell on the intricacies of such a simple code as in my example, but explain that logic is explained by three simple steps:
- Download HTML-page with the values of temperature
- With regulyarok "pull" the temperature
- Show TextView temperature
Actually the code that implements the above logic works:
package app.test.ufatermometr;


import android.app.Activity;

import android.os.Bundle;

import android.view.View;

import android.widget.TextView;

import android.widget.Button;

import java.io.InputStreamReader;

import java.net.URL;

import java.net.URLConnection;

import java.util.regex.*;


public class UfaTermometr extends Activity

{


@Override

public void onCreate(Bundle savedInstanceState)

{

super.onCreate(savedInstanceState);

setContentView(R.layout.main);

final Button button = (Button) findViewById(R.id.refrbutton);

button.setOnClickListener( new Button.OnClickListener() {

public void onClick(View v) // клик на кнопку

{

RefreshTemper();

}

});


RefreshTemper(); // при запуске грузим температуру сразу

};

//----------------------------------------------------------------

public String GetTemper(String urlsite) // фукция загрузки температуры

{

String matchtemper = "" ;

try

{

// загрузка страницы

URL url = new URL(urlsite);

URLConnection conn = url.openConnection();

InputStreamReader rd = new InputStreamReader(conn.getInputStream());

StringBuilder allpage = new StringBuilder();

int n = 0;

char [] buffer = new char [40000];

while (n >= 0)

{

n = rd.read(buffer, 0, buffer.length);

if (n > 0)

{

allpage.append(buffer, 0, n);

}

}

// работаем с регулярками

final Pattern pattern = Pattern.compile

( "<span style=\"color:#[a-zA-Z0-9]+\">[^-+0]+([-+0-9]+)[^<]+</span>[^(а-яА-ЯёЁa-zA-Z0-9)]+([а-яА-ЯёЁa-zA-Z ]+)" );

Matcher matcher = pattern.matcher(allpage.toString());

if (matcher.find())

{

matchtemper = matcher.group(1);

}

return matchtemper;

}

catch (Exception e)

{


}

return matchtemper;

};

//----------------------------------------------------------------

public void RefreshTemper()

{

final TextView tTemper = (TextView) findViewById(R.id.temper);

String bashtemp = "" ;

bashtemp = GetTemper( "http://be.bashkirenergo.ru/weather/ufa/" );

tTemper.setText(bashtemp.concat( "°" )); // отображение температуры

};

}
Once the application is written, it is possible to debug and test.
Running and testing applications
We remember about our virtual machine and run the usual button menus or Run → Run
Here's a picture we can then contemplate:

Now, if you want to share an application, you need to collect apk-file. For this we use the menu File → Export,and the list of Android → Export Android application. Next, select the project, then create a keystore keystore and the key key, this will need to fill in a few fields with all sorts of background information. The resulting file can be apk-distribute and even put in the Android Market, but you have to register and pay $ 25, which is in general a bit, especially for the standing of the project. But registration in markets, perhaps another article.
Conclusion
In conclusion I would say that certainly develop applications for Android is pleasant, is rather simple and interesting. Of course, we have considered only the tip of the iceberg, but I hope in the minds of those of you who have not tried doing anything like that "light bulb lit up," and it is possible that once your application will be in the millions.
Sources, references
A post materials are used:
www.ibm.com
www.itblog.name
Wikipedia
APK-application file
UPD: Eliminating Errors
Defite :
1. Error
ERROR: Unable to open class file C: \ workspace \ Test \ gen \ com \ example \ test \ R.java: No such file or directorysolved cleaning project in the menu Project → Clean or restart Eclipse.
2. When an error occurs
emulator: ERROR: no search paths found in this AVD's configuration. Weird, the AVD's config.ini file is malformed. Try re-creating it- A consequence of the fact that you have a Cyrillic user name. Solved: go to the Computer → System Properties → Advanced Settings → System Environment Variables. Create a new variable name and value ANDROID_SDK_HOME - by where the folder AVD (for example, C: \ Android \). Create, then looking in the same variable, Path, open and in the field of values, separated by semicolons to add the path to the folder tools Android SDK (for example, C: \ Android \ tools). Save. Launch Eclipse, run the program.